目次
WireGuard VPN の利用
v4.1.0 および v2.9.4rc7 から、WireGuard VPN を追加しました。
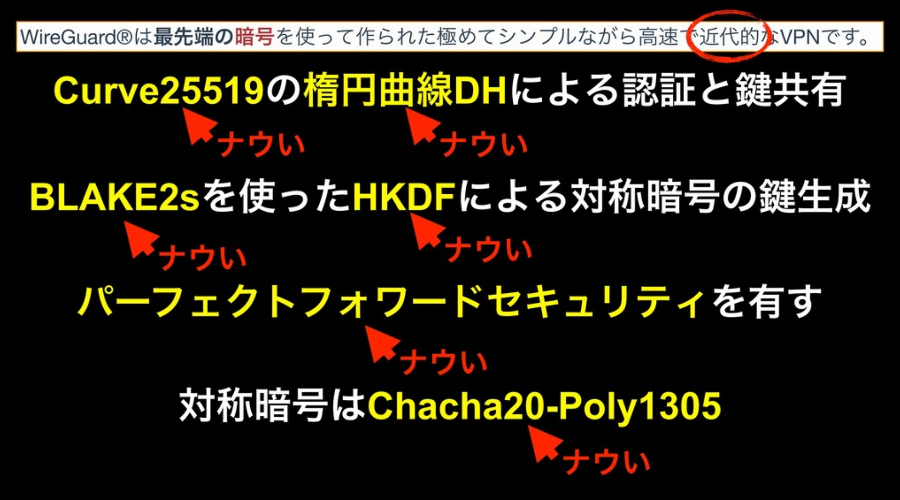
WireGuard については 作って理解するWireGuard - Speaker Deck が詳しいです。
WireGuard を使用することで、
- 固定アドレスが割り当てられないモバイル回線であっても、DynamicDNS 無しでリモートからアクセス可能。
- インターネット側に対しては全ポートを閉じておいても、リモートからアクセス可能。
- キャリアグレードNAT されたアドレスしか取得できないモバイル回線であっても、リモートからアクセス可能。
となります。
また、他の VPN (IPSec, OpenVPN 等) と比較して設定が非常に簡単なので、設定で悩まされることなく VPN 環境を構築可能です。
※ v4.4.0β12 から、WireGuard WebUI での設定1)を用意しました。
設定例
構成
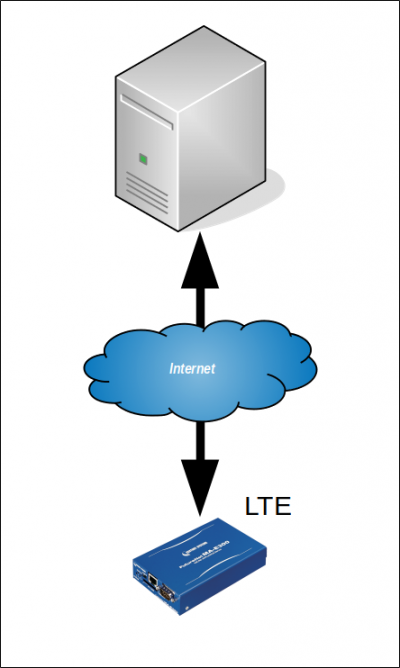
MA-E350/xx の LTE 回線経由でインターネット上のサーバーに WireGuard VPN で接続する例です。
WireGuard に割り当てるアドレスは下記のとおりとします。
| 機器 | アドレス |
|---|---|
| サーバー | 10.100.0.1 |
| MA-E3xx | 10.100.0.10 |
設定
鍵ペア生成
サーバー側
WireGuard QuickStart を参考に、鍵ペアを作成します。
root@server:/etc/wireguard# umask 077
root@server:/etc/wireguard# wg genkey | tee privatekey | wg pubkey > publickey
root@server:/etc/wireguard# ls -l
total 8
-rw------- 1 root root 45 May 30 13:56 privatekey  <--- 秘密鍵
-rw------- 1 root root 45 May 30 13:56 publickey   <--- 公開鍵
それぞれこのようなファイルが生成されます。
- /etc/wireguard/privatekey
eJIfe+fVRyhAHf1IKN0IyKLTauAgpwo0LbqqgFXP/0Y=
- /etc/wireguard/publickey
DPxHokFmmbPcTjTmRFVVMw2emP3m+jvP2fYcN/wzzhk=
クライアント側
同様に、MA-E350 側でも鍵ペアを生成します。
root@plum:/etc/wireguard# umask 077
root@plum:/etc/wireguard# wg genkey | tee privatekey | wg pubkey > publickey
root@plum:/etc/wireguard# ls -l
total 8
-rw------- 1 root root 45 May 30 14:03 privatekey
-rw------- 1 root root 45 May 30 14:03 publickey
クライアント側も同じような秘密鍵・公開鍵が生成されます。
- /etc/wireguard/privatekey
gDDRpKqXCGQuIGv76rH5hT/5Mk0vxtZSqKou0sMpO3U=
- /etc/wireguard/publickey
Ysc6tYtcfuHwkpkzlwXkQxNBnq7+DJOcOh+xYRIwymo=
設定ファイル作成
“wg0” の設定ファイルを作成します。
サーバー側
- /etc/wireguard/wg0.conf
[Interface]
# サーバー側秘密鍵
PrivateKey = eJIfe+fVRyhAHf1IKN0IyKLTauAgpwo0LbqqgFXP/0Y=
Address = 10.100.0.1
ListenPort = 51820

[Peer]
# クライアント側公開鍵
PublicKey = Ysc6tYtcfuHwkpkzlwXkQxNBnq7+DJOcOh+xYRIwymo=
AllowedIPs = 10.100.0.10/32
クライアント側
- /etc/wireguard/wg0.conf
[Interface]
# クライアント側秘密鍵
PrivateKey = gDDRpKqXCGQuIGv76rH5hT/5Mk0vxtZSqKou0sMpO3U=
Address = 10.100.0.10

[Peer]
# サーバー側公開鍵
PublicKey = DPxHokFmmbPcTjTmRFVVMw2emP3m+jvP2fYcN/wzzhk=
EndPoint = www.example.jp:51820
AllowedIPs = 10.100.0.0/24
PersistentKeepAlive = 30
必要な設定ファイルはこれだけです。
IPSec や OpenVPN に比較して圧倒的に簡単ですね。
“Interface” には自身の設定、“Peer” には対向側の設定をします。
| セクション | 項目名 | 設定内容 | 備考 |
|---|---|---|---|
| Interface | PrivateKey | 自身の秘密鍵 | |
| ListenPort | 待受ポート番号 | サーバー側で必須2) | |
| Address | WireGuard アドレス | ||
| Peer | PublicKey | 対向側公開鍵 | |
| EndPoint | 対向側IPアドレス:ポート番号 | クライアント側で必須 | |
| AllowedIPs | WireGuard経由で通信するネットワーク | ||
| PersistentKeepAlive | NAT を保持するための KeepAlive 送信間隔 [秒] | NAT配下のクライアント側で必須 |
接続
サーバ側、クライアント側ともに “wg-quick” コマンドで立ち上げることができます。
- サーバー側
root@server:/etc/wireguard# wg-quick up wg0
[#] ip link add wg0 type wireguard
[#] wg setconf wg0 /dev/fd/63
[#] ip address add 10.100.0.1 dev wg0
[#] ip link set mtu 1420 up dev wg0
[#] ip route add 10.100.0.10/32 dev wg0
- クライアント側
root@plum:/etc/wireguard# wg-quick up wg0
[#] ip link add wg0 type wireguard
[#] wg setconf wg0 /dev/fd/63
[#] ip address add 10.100.0.10 dev wg0
[#] ip link set mtu 1420 up dev wg0
[#] ip route add 10.100.0.0/24 dev wg0
確認
WireGuard 経由でアクセスできるか試してみます。
クライアントからサーバー
root@plum:/etc/wireguard# ping 10.100.0.1
PING 10.100.0.1 (10.100.0.1) 56(84) bytes of data.
64 bytes from 10.100.0.1: icmp_seq=1 ttl=64 time=315 ms
64 bytes from 10.100.0.1: icmp_seq=2 ttl=64 time=61.6 ms
64 bytes from 10.100.0.1: icmp_seq=3 ttl=64 time=61.0 ms
^C
--- 10.100.0.1 ping statistics ---
3 packets transmitted, 3 received, 0% packet loss, time 2003ms
rtt min/avg/max/mdev = 61.026/145.997/315.278/119.700 ms
サーバーからクライアント
root@server:/etc/wireguard# ping 10.100.0.10
PING 10.100.0.10 (10.100.0.10) 56(84) bytes of data.
64 bytes from 10.100.0.10: icmp_seq=1 ttl=64 time=552 ms
64 bytes from 10.100.0.10: icmp_seq=2 ttl=64 time=45.8 ms
64 bytes from 10.100.0.10: icmp_seq=3 ttl=64 time=45.0 ms
64 bytes from 10.100.0.10: icmp_seq=4 ttl=64 time=63.8 ms
64 bytes from 10.100.0.10: icmp_seq=5 ttl=64 time=62.6 ms
^C
--- 10.100.0.10 ping statistics ---
5 packets transmitted, 5 received, 0% packet loss, time 4003ms
rtt min/avg/max/mdev = 45.055/154.100/552.982/199.601 ms
SSH でリモートログインしてみます。
root@server:/etc/wireguard# ssh -l user1 10.100.0.10
user1@10.100.0.10's password:
user1@plum:~$
双方向ともアクセス可能になりました。
今回の例では、クライアント側はキャリアグレードNATされる回線であり、下記のIPアドレスが割り当てられた状態です。
root@plum:/etc/wireguard# ifconfig ppp0
ppp0      Link encap:Point-to-Point Protocol
          inet addr:100.71.46.31  P-t-P:10.64.64.64  Mask:255.255.255.255
          UP POINTOPOINT RUNNING NOARP MULTICAST  MTU:1500  Metric:1
          RX packets:29 errors:0 dropped:0 overruns:0 frame:0
          TX packets:31 errors:0 dropped:0 overruns:0 carrier:0
          collisions:0 txqueuelen:3
          RX bytes:3796 (3.7 KB)  TX bytes:3620 (3.6 KB)
このような状況でもリモートアクセスが可能で、なおかつ NAT 配下にいるのでポートスキャンや SSH ブルートフォースアタックなどをされる心配がないため、
固定 IP アドレスをもらえる回線よりもむしろ安全で良いのかな、という気もします。
TIPS
MA-E3xx で PPP 経由で自動接続させる
v4.x 系(Ubuntu 18.04LTS) の場合
systemd の service (wg-quick@.service) を有効化することで対応可能です。
root@plum:~# systemctl enable wg-quick@wg0
Created symlink /etc/systemd/system/multi-user.target.wants/wg-quick@wg0.service → /lib/systemd/system/wg-quick@.service.
root@plum:~#
v2.x 系(Ubuntu 14.04LTS) の場合
/etc/ppp/ip-up.d/ に wg-quick を呼び出すスクリプトを作成しておくことで、PPP 接続と同時に WireGuard 接続することができます。
- /etc/ppp/ip-up.d/9999wireguard
#! /bin/sh
#
# ip-up script for WireGuard

if [ "$PPP_IFACE" = "ppp0" ]; then
    logger -t ip-up "$PPP_IFACE up -> up WireGuard."
    (sleep 5 && wg-quick up wg0 && ping -c 10 10.100.0.1) &
fi
複数拠点を収容する
サーバー側の “Peer” セクションを追加することで対応可能です。
- /etc/wireguard/wg0.conf
[Interface]
# サーバー側秘密鍵
PrivateKey = eJIfe+fVRyhAHf1IKN0IyKLTauAgpwo0LbqqgFXP/0Y=
Address = 10.100.0.1
ListenPort = 51820

[Peer]
# クライアント側公開鍵 0
PublicKey = Ysc6tYtcfuHwkpkzlwXkQxNBnq7+DJOcOh+xYRIwymo=
AllowedIPs = 10.100.0.10/32

[Peer]
# クライアント側公開鍵 1
PublicKey = OyMpcsHfBKpkSnxl9J3rZWpU2zkgfusZnf/pkdJ6ix4=
AllowedIPs = 10.100.0.11/32

[Peer]
# クライアント側公開鍵 2
PublicKey = vKjYvuQ4qqgFZi9H0CrJ2UW4opg9YWS5eMCGz/B8Kwg=
AllowedIPs = 10.100.0.12/32
拠点間接続をする
“Peer” の “AllowedIPs” にネットワークをカンマ区切りで設定することで可能となります。
172.16.0.0/16 へのルーティングを有効化する場合
- /etc/wireguard/wg0.conf
[Interface]
PrivateKey = eJIfe+fVRyhAHf1IKN0IyKLTauAgpwo0LbqqgFXP/0Y=
Address = 10.100.0.1
ListenPort = 51820

[Peer]
PublicKey = LU9wj74KIc5ND+F76Amw9GyrLrwgLmBT9JOxTEaPqAY=
AllowedIPs = 10.100.0.10/32, 172.16.0.0/16
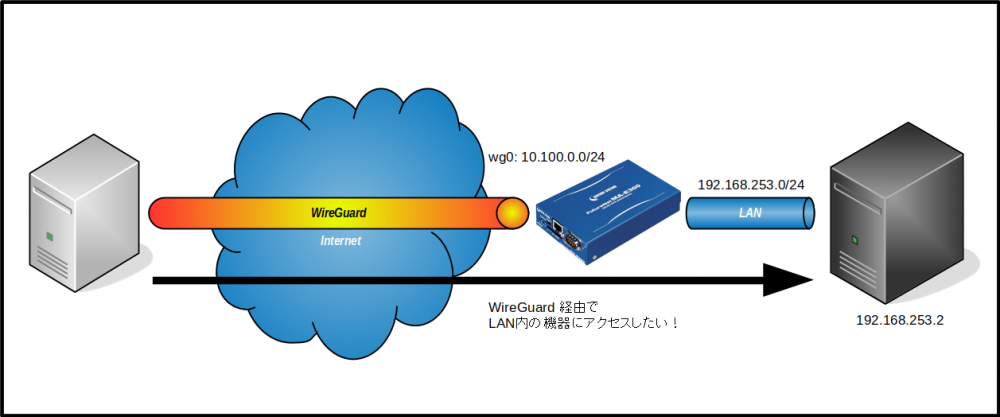
LAN 内の機器に WireGuard 経由でアクセスしたい
LAN 内の機器にリモートからアクセスしたいけど、LAN 内の機器のルーティング変更はさせてもらえない、とか
ルーティングを変更するのは面倒くさい、、、とか、ありますね。
MA-E3xx 側の WireGuard 設定ファイルに、PostUp/PreDown で WireGuard のアドレスをソースとしたパケットに対する MASQUERADE ルールを追加するだけで可能です。
- /etc/wireguard/wg0.conf
[Interface]
PrivateKey = kEZJD3XwR4C93FQV4k3kxKXZN4lb3BteQ8QmidevC08=
Address = 10.100.0.10
PostUp = iptables -t nat -A POSTROUTING -s 10.100.0.0/24 -j MASQUERADE
PreDown = iptables -t nat -D POSTROUTING -s 10.100.0.0/24 -j MASQUERADE

[Peer]
PublicKey = 27XZDfokt17uJZ+pvGXIRqLk2RMiPk55d12rzdDzAVY=
EndPoint = www.example.jp:51820
AllowedIPs = 10.100.0.0/24
PersistentKeepAlive = 30
サーバー側には LAN 内のアドレスへのルーティングを追加しておきます。
- /etc/wireguard/wg0.conf
[Interface]
PrivateKey = CGqjI+42V0TFA699Rf5SRd/+HWmUnwFudhh+vjToGWw=
ListenPort = 51820
Address = 10.100.0.1

[Peer]
# MA-E3xx
PublicKey = PgXan/MXjXWQkwesEqkVUN1ggg6XyB8f86yr96ZiDio=
AllowedIPs = 10.100.0.10/32, 192.168.253.0/24
※ MA-E3xx の LAN、192.168.253.0/24 へのルーティングを追加しています。
テスト
Internet 上のサーバー側から LAN 内の機器にアクセス可能か試してみます。
root@server:~# traceroute 192.168.253.2
traceroute to 192.168.253.2 (192.168.253.2), 30 hops max, 60 byte packets
 1  10.100.0.10 (10.100.0.10)  1117.021 ms  1116.872 ms  1116.762 ms
 2  192.168.253.2 (192.168.253.2)  1116.687 ms *  1116.487 ms
root@server:~# ping -c 5 192.168.253.2
PING 192.168.253.2 (192.168.253.2) 56(84) bytes of data.
64 bytes from 192.168.253.2: icmp_seq=1 ttl=63 time=610 ms
64 bytes from 192.168.253.2: icmp_seq=2 ttl=63 time=47.5 ms
64 bytes from 192.168.253.2: icmp_seq=3 ttl=63 time=45.4 ms
64 bytes from 192.168.253.2: icmp_seq=4 ttl=63 time=43.7 ms
64 bytes from 192.168.253.2: icmp_seq=5 ttl=63 time=70.6 ms

--- 192.168.253.2 ping statistics ---
5 packets transmitted, 5 received, 0% packet loss, time 4006ms
rtt min/avg/max/mdev = 43.751/163.511/610.198/223.556 ms
問題なくアクセスできることが確認できました。
今回作成したサーバーにスマートフォンでアクセスする
クライアント用の設定を作成し、iPhone, Android アプリ用に設定を QR コードで出力することができます。
[参考] Mobile clients Configuration - Debian Wiki


